You probably know about AI image generators by now. Text-to-image models can generate new images in all kinds of styles in seconds. But creating images apparently from thin ai isn’t generative AI’s only trick. It has many more uses for visual design, including practical uses for those working with real photos of real places, people and objects.
Even with today’s hardware, it can be hard to get the perfect shot in camera, particularly outside of a studio setting. Low light, a moving subject or the wrong settings can lead to blur and image noise, and if you’re using a phone or a more budget camera, the chances are that your image won’t have a high enough resolution to print at a large size. This is where AI comes in, enhancing the quality of images that may have been created in less than perfect conditions. Below I’ll outline 4 ways that AI can improve your shots, without resorting to all out fabrication.
01. Blow up your photos
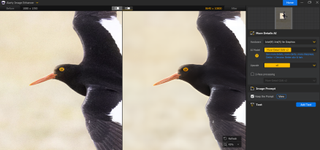
There are many reasons you might want to enlarge an image. It may be an old photo or a scanned image that has such low resolution that it looks poor even on digital displays. And if you want to print an image at a large size, many cameras don’t have high-enough resolution for a clear, crisp reproduction. In my case, I’m lucky enough to have a camera that produces high resolution images, but I tend to crop a lot, and that can leave an image short of pixels for printing at a large size. I’ve also had cases where I exported images at one size for digital and deleted the originals, only for the client to come back months later saying they wanted to print the photos.
Fortunately, AI upscaling tools are becoming a lot better at resolving situations like this. They’ve been trained to use AI to add extra pixels to an image, filling in the details in a realistic way to allow an image to be increased 2x, 4x and beyond. Just a word of caution. Inspect images closely and adjust the AI model or setting as necessary because AI upscaling can sometimes apply strange artifacts and some quite crude-looking sharpening if you’re not careful. Even the best upsampling techniques rely on cues that may not be found in every image. Also be realistic. The more extreme the enlargement, the worse it’s likely to look.
02. Kill the noise
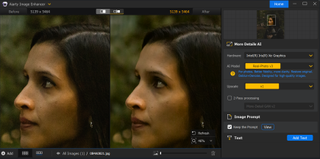
One area where generative AI can truly save the quality of a photo is noise. Today’s flagship cameras allow photographers to crank the ISO up much higher than in the past, but insufficient exposure in low light conditions still brings up the problem of image noise in shadows, and these grainy looking random variations in luminance or colour can make a photo unusable.
AI denoising, such as that provided by Aiarty, uses machine learning to interpolate those random patterns of noise and then remove it from the image. And it tends to work better than older denoising software because it uses a dynamic technique, adjusting to the specific noise pattern of each photo rather than using a fixed filter. Again, to get the best results you’ll want to adjust the AI model or the balance between denoising and the preservation of detail to get the optimum result.
03. Get sharp
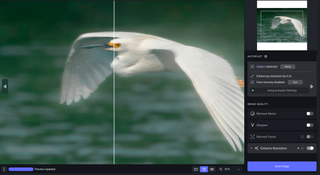
AI tools also provide an option for improving the quality of images that aren’t quite in focus, be that because of camera shake, a subject’s movement, or just because your focus was slightly off. Unlike traditional sharpening tools, AI image sharpening algorithms have been trained on many thousands of images so that they can detect and attempt to reverse lens blur and motion blur. Some are trained to be able to automatically detect the subject of an image too so that you can only apply sharpening where you want it.
Get the Creative Bloq Newsletter
Daily design news, reviews, how-tos and more, as picked by the editors.
Again be realistic here. AI sharpening doesn’t mean you can stop worrying about focusing on your subject. It can look very digital and unnatural when used indiscriminately on very out-of-focus shots. Always check carefully the results of any AI and change the model or setting you’re using if needed to get the right level of realism that you’re after.
04. Take the slog out of retouching
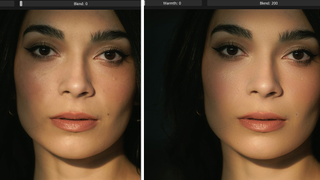
Finally, we come to what can be one of the most tiresome and time consuming parts of photo editing. Even with the myriad tools in modern editing software, retouching can take a long time. There’s the dodging and burning to even out shadows and highlights, there’s the airbrushing to smooth out skin imperfections, the removing of dust and any unwanted distractions. Fortunately, there’s a bunch of AI tools that can help here. Even many smartphones now come with AI object removers built in, although the results can be a little too obvious sometimes.
There are AI plugins and standalone tools that can remove dust in a single click or remove skin blemishes without you having to click on each one. The most sensitive tools can even tell between distinguishing features you might want to keep and acne or uneven shadows that you might not, and they give you the flexibility to decide.
Ultimately, even if you’re not into image generation using AI, it’s impossible to deny the convenience of AI tools for improving photo quality. Whether you’re enhancing old archive photos to preserve them, you want to save a shot that was taken in low light, or you just want to speed up the process of retouching big batches of images, there are AI tools that can make your life a lot easier.
Joe is a regular freelance journalist and editor at Creative Bloq. He writes news, features and buying guides and keeps track of the best equipment and software for creatives, from video editing programs to monitors and accessories. A veteran news writer and photographer, he now works as a project manager at the London and Buenos Aires-based design, production and branding agency Hermana Creatives. There he manages a team of designers, photographers and video editors who specialise in producing visual content and design assets for the hospitality sector. He also dances Argentine tango.


